Building to your NuGet Gallery

Build Process Meets NuGet Gallery

The next logical step is integrating your NuGet gallery with your existing build processes. If you don’t have a build process and you’re looking for a little “getting started” guidance with Team Foundation Server (TFS) build processes, check out the Microsoft Visual Studio ALM Rangers Build Customization Guide at rabcg.codeplex.com.

All right: You have a library you want to make available on a gallery, which could be the official NuGet Gallery, a proprietary gallery or even a local file share. No matter which, you’ll have to perform certain tasks to create the NuGet package, and they’re generally the same tasks no matter where the gallery resides.

Through the course of developing your product, you’ll repetitively go through the process of coding, compiling, packaging, pushing and publishing. You’ll also, we hope, include a couple of healthy doses of testing; results from that testing might make you deviate from publishing to the gallery if you find any issues
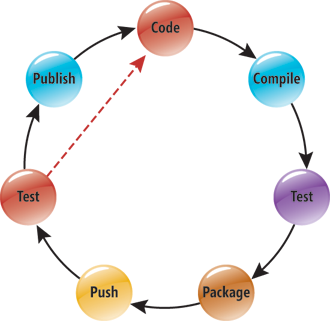
 

Keeping consumers happy with working software is a good thing, and you’ll have an easier time doing so using a managed process. Remember, though, the managed process can’t be entirely automated; there’s no replacement for human verification. Don’t assume you can publish just because your software passes all the automated tests. You could easily publish a package that isn’t ready and make your consumers angry. Moreover, they won’t be happy if you publish constantly and they can’t keep up with the ever-changing versions. Make publishing a conscious decision.

Use the build process to build, package and push your NuGet library to a gallery where you perform final tests and do that human verification. That way, you can choose continuous integration or a scheduled build to automatically push the package and make it ready for you to test. How might you do that? Here’s an example using TFS and its workflow-based automated build capability.

NuGet.exe is a stand-alone, parameter-driven console application, but it can easily be called by another process, such as TFS Team Build. Team Build executes a workflow; in TFS terms, this is a set of custom activities controlled through a build template and initiated by a build definition. One packaged solution for automating the NuGet development process is the NuGetter project at nugetter.codeplex.com. This project provides an automated shell around the NuGet.exe application. We’ll use this package to show what can be done and things to think about as you work toward automating your own NuGet packages.

The build definition in TFS is where you provide all the necessary information to do the packaging, push and publish. Building a flexible and repeatable build process for NuGet requires several pieces of data and the switches that turn portions of the process on or off. The data is organized into categories that are titled to give you a sense of the order in which the steps are executed.


The PrePackaging section is used for complicated or multiframework NuGet packaging that requires some initial preparation. NuGetter can call a Windows PowerShell script (if you desire) to organize the library files to make packaging easier. This step isn’t required, so you can use the flag parameter “Invoke PowerShell Script” to tell the process whether to execute the script.

You can use a .nuspec file directly to define how your package will be created or you can do so indirectly through a .csproj file. It’s up to you; use the approach that better suits your needs.

As you can see, all of the parameters required for packaging are included. Version, base path (source folder for packaging), API Key and gallery location (called Source) are all provided as part of the build definition. However, the security of this information might be of great importance to you. For example, the API Key is what allows you and only you to push NuGet packages to the gallery. If that key becomes public, anyone could push bogus packages in your name. Because of this, NuGetter allows you to provide either the actual API Key or a path to a file that contains the key. If you use a file path, the build process reads the file, extracts the key and uses it without listing the key in the log, and security is maintained. Obviously, the build service ID must have read access to the file for this to work.

Another potential issue for you is managing the version of your package. In Figure 6, the version number is provided in the build definition. But, do you really want to keep changing that number in the build definition? What happens when you have several builds (continuous integration [CI], daily, other scheduled and various manual builds)? NuGetter gives you the choice to enter the version directly or, as with the API Key, you can provide a file path that multiple build definitions can use. They will all use the same version number and you can manage it in just one place.

The Push Destination in the example is the NuGet Gallery, but this is where you provide the build destination even if you’re pushing your package to an internal gallery or to a local file store. This is another case where the build process might need to intervene. NuGet.exe expects a URL as the destination and if you’re pushing to a local store—which won’t be a URL—the process needs to interpret the destination format. In this case, instead of using NuGet.exe to do the pushing, you have the build process do it.

For reasons of completeness and feature parity with NuGet.exe, NuGetter does provide for automated publishing. Just keep in mind our earlier caveats before deciding to use this capability.

Original article

Your very own NuGet Gallery

Why Host your own NuGet Gallery?

NuGet.org already exists as a public repository for NuGet packages, so you might question the point of hosting a gallery. That’s understandable, but what about leveraging that ecosystem infrastructure within the walls of your own dev environment? Why not set up your own private gallery not only to facilitate your product’s development ecosystem but, better yet, to tie it directly to your build and deployment processes? Moreover, anything you see at NuGet.org is available to you free.

Fastest and Simplest

The easiest way to host your own NuGet gallery is to expose a file share. This might sound a bit rudimentary, but if you need something fast and simple, this method works extremely well. The share can be structured as you see fit, placing your packages—that is, your *.nupkg files—anywhere on the share. You can refer to the share as a package source.

With the package source created, let’s add it to the development environment. You can have as many package sources as desired and easily move between each. To edit your package sources in Visual Studio, navigate to Tools | Options | Package Manager | Package Sources. Note that as of this writing, version 1.5 was current. You should expect slight differences across NuGet versions.

Here you can add, remove and change the default package source. If you prefer, you can do the same in WebMatrix, a free development environment. Just click on the NuGet Gallery icon on the main menu and select Add Source

As you can see, both figures list two package sources. You can choose to use just one or all at any given time.

Introducing NuGet Gallery

While the file system package source is very easy to set up and start using, it breaks down pretty quickly when you start scaling out. Luckily, NuGet.orgwas built with exactly this in mind, to provide an open platform for people to take, extend and build on for their own needs. You can find the NuGet Gallery project at github.com/NuGet/NuGetGallery. The NuGet Gallery is an ASP.NET MVC 3 project built on top of Razor, OData, SQL Server and Windows Azure.

The best way to understand the features and functionality the NuGet Gallery has to offer your development ecosystem is to simply explore NuGet.org.

Before you can create and publish a package, you need to be a registered user. Once you’ve registered, you have full rights to upload and manage your packages and edit your profile. You can also generate the unique API key that lets you automate publishing packages to the Gallery (see Figure 3). For more information about publishing a package, please see the previous article in this series, “Becoming a NuGet Author.”

When you upload a package to the NuGet Gallery, it automatically receives its own place in the Gallery

This is where you can view all of the important information about a package. For each package, the NuGet Gallery tracks the version downloads, total downloads, dates, licenses and so on. Of course, a package on the NuGet.orgsite will most likely yield considerably larger download numbers given its ecosystem, but these statistics are vital to any package author, regardless of project size.

The package feed is clearly the most important feature in the overall stack. It’s an OData feed you’ll find at http://YourGallery/api/v2. This is the same URL you’ll use as your package source. Without this feed, all of the power of NuGet is lost.

Original article

Deploy website from Visual Studio to IIS

MSDeploy is really good for deploying websites and syncing up websites but it can be a real pain to configure and get going intially. The MSDeploy documentation is a bit poor as well and quite often you’ll get a very strange error which can be quite cryptic.

Error Code: ERROR_DESTINATION_NOT_REACHABLE 

The error message isn’t actually too bad in this case, it’s saying either the Web Management Service isn’t running OR it can’t find MSDeploy. Ok so checklist for this problem:

  • Web Management Service (WMSVC) is running on the target server
  • Port 8172 is open (checked with Telnet for good measure)
  • Can you connect to https://servername:8172/msdeploy.axd
  • Is MSDeploy installed
installing the latest version ms MSDeploy did it for me. 
 
For a full Microsoft answer check out Configuring a Web Server for Web Deploy Publishing (Web Deploy Handler)
 
 
If you are still having troubles go though this set of steps: 


VS12 switching Menu to Lowercase

If you are like me and you don’t like people shouting, you’ll be quite releaved that you can stop the Menus from Visual Studio 2012 from shouting at you by changing the Menus from Uppercase to Lowercase is as simple as adding the following key in the registry:

HKEY_CURRENT_USER\Software\Microsoft\VisualStudio\11.0\General\SuppressUppercaseConversion
REG_DWORD value: 1

Need to Localize an XSLT

Here is our attempt at the XLST translator, main chunk of the work was by Darren, it’s a console application that applies an xsl (i.e. circle.xsl) to some xml (i.e. number.xml) and writes out the result to a console window.

private const String _filename = "number.xml";
private const String _stylesheet = "circle.xsl";
private const String _culturename = "en";
public Program()
{
    //Set the UI to the specified culture.
    Thread.CurrentThread.CurrentUICulture = new CultureInfo(_culturename);

    //Create the XslTransform and load the stylesheet.
    XslCompiledTransform xslt = new XslCompiledTransform();
    xslt.Load(_stylesheet);

    //Load the XML data file.
    XPathDocument doc = new XPathDocument(_filename);

    //Create an XsltArgumentList.
   XsltArgumentList xslArg = new XsltArgumentList();

   //Add an object to get the resources for the specified language.
   ResourceTranslator resTran = new ResourceTranslator("Resources.Resource");
   xslArg.AddExtensionObject("urn:myResTran", resTran);

   //Add an object to calculate the circumference of the circle.
   Calculate obj = new Calculate();
   xslArg.AddExtensionObject("urn:myObj", obj);

   //Create an XmlTextWriter to output to the console.             
   XmlTextWriter writer = new XmlTextWriter(Console.Out);

   //Transform the file.
   xslt.Transform(doc, xslArg, writer, null);

   writer.Close();
}
//Calculates the circumference of a circle given the radius.
public class Calculate
{
    public static double Circumference(double radius)
    {
        return Math.PI * 2 * radius;
    }
}

The translation is based upon our database resource translator i.e. a class that creates a resource manager based on the default/neutral resource resx, and implements a Find method. This method takes a string that we want to find (specified in the default language i.e. in our case English) which is then effectively used as a key into the resource file(s). The text that is passed into the Find method is first converted into a valid identifier (e.g. spaces removed, slashes removed etc… etc…), before it can be used as a key. Then, if a key exists for the specified culture (French in the case of the test solution) then the appropriate language version of the original passed in text is returned. 

In order to use the resource translator in the xsl, an object of this type is first created and then passed into the xsl using extension objects. The Find method can then be called by referencing the correct extension object, and specifying the piece of text that we would like to be translated.
 
public string Find(string displayText)
{
    if (displayText == null) return null;

    var assem = System.Reflection.Assembly.Load("Resources");
    var rman = new ResourceManager(_baseName, assem);
    var s = rman.GetString(Regex.Replace(displayText, "[^\\w]", string.Empty, RegexOptions.CultureInvariant));
            
    return s jQuery15201710984220262617_1352536393022 displayText;
}

XslResourceTranslator.zip (90.45 kb)

Source can be found on GitHub https://github.com/BryanAvery/XslResourceTranslator

EntityFramework 4.0 and SQL 2000

If you are like me, some customer just can’t upgrade from SQL 2000, so how do you use the EntityFramework 4.0+ with SQL Server 2000?

Here is one solution that has worked for me:

Here are the steps to add a new Entity Framework 4.0+ entity context to a Visual Studio 2010 project:

  • Download the base entity data model for SQL Server 2000 file and save it to the project folder to which you wish to add the SQL 2000 entity context. Do NOT add it to your project yet.
  • Rename the EDMX file to the name of the data context.
  • Open the EDMX file in a text editor.
  • Find/replace all references to %DB_NAME% with your own value.
  • Add this new connection string section to your App or Web.config and find/replace with your own values:
<connectionStrings>
  <add name="%DB_NAME%Entities" connectionString="metadata=res://*/%DB_NAME%.csdl|res://*/%DB_NAME%.ssdl|res://*/%DB_NAME%.msl;provider=System.Data.SqlClient;provider connection string="Data Source=%DB_HOST_NAME%;Initial Catalog=%DB_NAME%;Persist Security Info=True;User ID=%DB_USER%;Password=%DB_USER_PWD%;MultipleActiveResultSets=False"" providerName="System.Data.EntityClient" />
</connectionStrings>

Please note: the connection string name MUST MATCH the EntityContainer section name you specified in the EDMX file.

  • Find/replace all references to %DB_NAME% in the App or Web.config file with your own value as above.
  • After the .edmx and web.config files configured, add them to the project and verify the new entity data source appears after refreshing the Data Source manager window.
  • If you can’t double click on your *.edmx file you’ll need to right click on it and select “Open with”, and choose “ADO.NET Entity Data Model Designer”
  • If the new entity data source appears, open the .edmx file in design view and refresh the design model.

Now you have your Entity XML file next you can generate your Code by using the T4 templete code generation.  To do this just right click in the EDMX model and select “Add Code Generation Item” this will give you the installed Generators (you can get more from NUGET, like dbcontext”

I’ve found this very useful and gives you a head start on old databases.

iOS 6 Passbook problem

So you’ve upgraded to iOS 6 and keen to tryout all the new features one of them being the Passbook, time to get rid of all those printed tickets and even start thinking of replacing that old leather wallet.

So you click on the Passbook


Then you tap the App Store button to see what apps that are supported with Passbook.


If you are like me you’ll get “Can’t connect to iTunes Store” error  Undecided

But wayhay I found the old solution of setting the date forward manually cure this issue.  It takes a few easy steps to manually change the date.

  • Open Settings
  • Open General
  • Open Date & Time
  • Turn off Automatically setting to Off
  • Open Set Date & Time
  • set the date to one year ahead
Now try out the Passbook and you’ll be able to connect to the Apps Store, if you are like me you’ll be disappointed as only two apps are currently available United Airlines and Lufthansa, none of which I use or have any intention of using.


Oh don’t forget to reset your Date to Automatic


this and that