Difference between POST and PUT

I was asked a question today about what was the difference between POST and PUT when referring to HTTP.

There seems to be some confusion over what people understand it to be; it is quite simple, just to avoid any confusion here is the RFC itself explains the core difference:

The fundamental difference between the POST and PUT requests is reflected in the different meaning of the Request-URI. The URI in a POST request identifies the resource that will handle the enclosed entity. That resource might be a data-accepting process, a gateway to some other protocol, or a separate entity that accepts annotations. In contrast, the URI in a PUT request identifies the entity enclosed with the request — the user agent knows what URI is intended and the server MUST NOT attempt to apply the request to some other resource. If the server desires that the request be applied to a different URI, it MUST send a 301 (Moved Permanently) response; the user agent MAY then make its own decision regarding whether or not to redirect the request.


Git Workflow

Source control packages always have been a bit of a pain when you first start using them. You may know the principles of source control. Each environment has its own way and definitions and its own processes. Once you are used to using a source control system and the steps you follow it is easy. I call this the Source Control shuffle.

It’s always good to have a workflow that allows for code review and this process below will provide a method to do this by using branches and merging back into the master.

The branching, committing and merging workflow for projects using git source control.

Guiding Principals

  • master is always production ready and suitable for deployment
  • create a new branch for every feature or fix
  • on each branch, NEVER work on anything but the specific task related to it. If you see other work that needs doing during the course of development, submit a ticket for it, or check out a new branch.
  • rebase during feature development, explicit ( --no-ff ) merge when complete.

Feature Process (or the shuffle)

New features that are added to the product for a future release.

N.B. bug fixes that should go into the next feature release, rather than a hotfix, should also use this process.

  1. Pull down the latest changes from master.

    git checkout master
    git fetch origin
    git merge master
    
  2. Create a new branch for the work. Use the issue key followed by a descriptive name for the branch.
    git checkout -b PRJ-123-feature-name
  3. Work on the feature.
    1. Make regular commits
    2. Avoid clustering changes together.
    3. Push to remote as needed, to keep a backup of your work.
    4. If you need to work on another task, ensure all changes are committed before creating a new branch or switch to another one.
    5. Only one developer should work on a feature branch. If more than one developer needs to work on the task, each should branch off again (including the first developer to start work) from the shared branch. Merges should be made to the task branch as per the central workflow.
  4. Keep your branch up to date with the latest changes on master

    git fetch origin git rebase origin/master
  5. When ready for feedback and/or code review, push to remote and create a pull request.

    1. Push to remote:

      git push -u origin PRJ-123-feature-name

    2. Create a pull request on VSTS to merge the feature branch into master:\
  6. Code review should now occur. If changes are required, they can be committed and pushed to the same branch. The pull request will be automatically updated with any new commits.
    N.B. Any changes made from now on should occur using merges only. If master needs to be merged into the branch to update it, you should not use rebase, as this will cause problems with the pull request.
    Once the review is complete, perform a final rebase (see Feature Process above) to prepare to merge. Then push to remote again (see 5.a above).
  7. The pull request should now be completed on VSTS. This will create a merge commit. There should be no actual changes or conflicts in this commit if the previous procedures have been followed correctly.
  8. Delete the feature branch. This is an option on the remote during the pull request completion in VSTS. The branch will also need to be deleted locally by the developer:
    git branch -d PRJ-123-feature-name

Hotfix Process

Bug fixes that need to be applied to the currently released version (or to patch a previous version that is still supported) and require a new patch version release.

  1. Pull down the latest changes from master (see Feature Process 1. above).
  2. Check out the tag of the release you want to hotfix, branch from it and check out the new branch:

    git checkout v1.0.0 git branch PRJ-199-hotfix-name git checkout PRJ-199-hotfix-name
  3. Work on the bug fix, following the notes in Feature Process 3.
    N.B. It is important that you DO NOT follow step 4. of Feature Process, as changes from master should not be brought into your hotfix branch.
  4. When ready for feedback and/or code review, push to remote.
    N.B. DO NOT create a pull request to master.
  5. Follow the Release Process, using the hotfix branch instead of a release branch.
    N.B. hotfix/patch releases should contain just one bug fix.

Release Process

This process starts when preparing to make a release after all code tasks for that release are merged into master. Final work may still be necessary to complete the release.

  1. Create a new branch from, master either in git directly, or locally, having first pulled the latest changes from master. If you create the branch locally, the currently checked out branch will be used to branch from.
  2. The branch should be named release with the version number appended, e.g. release-1.1.0
    This marks the point at which no more features will be added to the release. Only adjustments and bug fixes necessary to put the release into production should be applied to this branch.
    However, work can continue on new features for other releases, by branching off, master as covered above.
  3. Any further work to prepare this release should be merged into this release branch, using the same process as Feature Process, but creating pull requests to and rebasing from the release branch, instead of master.
  4. Once the release is ready, update the assembly version in the release branch to match Jira and commit, then deploy the build via the deployment machine – this will usually involve checking out the new release branch, running the grunt script to grab the correct web configs and log4net configs and then deploying from Visual Studio.

  5. Note that the version number as reported in the health check will always have 4 digits even though we are only using 3.
  6. Create a tag on the release branch once you are happy that the release was successful

    git checkout release-1.1.0 git tag v1.1.0 git push --tags origin release-1.1.0
  7. Merge the release into master after the release has been tested and is finished: If there are any errors with the release, a decision will need to be made by the Development Manager whether to fix the release branch or to revert the release and do it again.
  8. Merging back into master should be done with a pull request on git.
  9. The release branch can now be deleted.


Symmetric encryption/decryption routine using AES

The following is a symmetric encryption/decryption routine using AES in GCM mode. This code operates in the application layer and is meant to receive user-specific and confidential information and encrypt it, after which it is stored in a separate database server. It also is called upon to decrypt encrypted information from the database.

The full description of the AES in GCM mode can be found in this document produced by David A. McGrew and John Viega The Galois/Counter Mode of Operation (GCM)


Database Layer

The DatabaseLayer is an abstraction for database access which means the calling application or library does not need to be tight-coupled to the database itself. A set of factory methods is available to call in order to create commands and parameters, all based on the .NET abstract base classes.

Currently supported engines are SQL server and MySQL, represented by “sql” and “mysql” in your web.config or app.config.

The DatabaseLayer does not use a provider pattern but the argument is passed in the factory to tell the library what database engine to use. An example is shown below. It is preferable to create one constant for the database type and share it across multiple places it is used.

The example below is lazy loaded and uses AppSettings and ConnectionStrings from the web.config or app.config file.

private static Database database;

internal static Database GetDb()
{
if ( database == null )
{
database = Database.GetDatabase(
ConfigurationManager.AppSettings["databasetype"],
ConfigurationManager.ConnectionStrings["myconnection"].ConnectionString);
}
return database;
}

DatabaseLayer solution

Security Links and References

To get a level of how many data breaches are happening Breach Level Index provides this information, along with many other statistics

http://breachlevelindex.com/

Need to check if you have an email account that has been compromised in a data breach when check out Have I Been Pwned to check if you have been compromised and also Signup to get email notifications

https://haveibeenpwned.com/

For a collection of Cryptography APIs in one library

https://www.bouncycastle.org

HSM hardware

https://www.thales-esecurity.com/products-and-services/products-and-services/hardware-security-moduleshttps://www.thales-esecurity.com/products-and-services/products-and-services/hardware-security-modules

Azure Resource Manager Templates Tips and Tricks for a Application Service

Over the past week, I spent some time automating Azure App Service infrastructure with Azure Resource Manager (ARM) templates. I discovered a few tips and tricks along the way that I’ll describe in detail below…

  • Take an environment name as a parameter
  • Create sticky slot settings
  • Variables aren’t just for strings
  • Change the time zone of your web app

Big thanks to David Ebbo’s talk at BUILD and his sample “WebAppManyFeatures” template; they are super handy resources for anyone who is working on writing their own ARM templates.

Environment Name Parameter

ARM templates are useful for creating the entire infrastructure for an application. Often this means creating infrastructure for each deployment environment (Dev, QA, Production, etc). Instead of passing in names for the service plans and web apps, I find it useful to pass in a name for the environment and use it as a suffix for all the names. This way we can easily use the same template to set up any environment.

{
    // ...
    "parameters": {
        "environmentName": {
            "type": "string"
        }
    },
    "variables": {
        "appServicePlanName": 
            "[concat('awesomeserviceplan-', parameters('environmentName'))]",
        "siteName": 
            "[concat('awesomesite-', parameters('environmentname'))]"
    }
    // ...
}

In the above example, if we pass in “dev” as the,environmentName we get “awesomeserviceplan-dev” and “awesomesite-dev” as our resource names.

Sticky Slot Settings

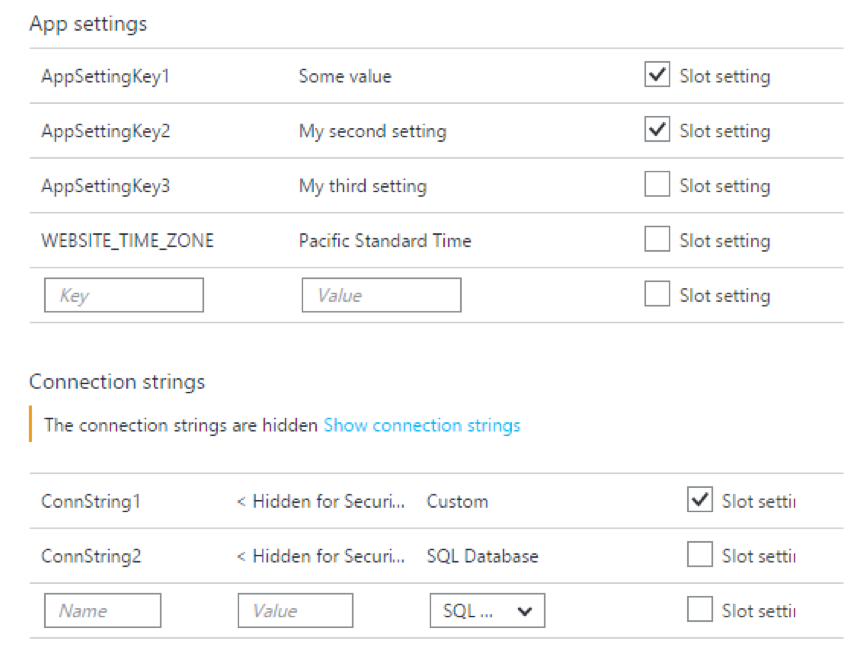
App settings and connection strings for a Web App slot can be marked as a “slot setting” (i.e., the setting is sticky to the slot). It’s not well documented how to specify sticky slot settings in an ARM template. It turns out we can do this using a config resource section called “slotconfignames” on the production site. Simply list the app setting and connection string keys that need to stick to the slot:

{
    "apiVersion": "2015-08-01",
    "name": "slotconfignames",
    "type": "config",
    "dependsOn": [
        "[resourceId('Microsoft.Web/Sites', variables('siteName'))]"
    ],
    "properties": {
        "connectionStringNames": [ "ConnString1" ],
        "appSettingNames": [ "AppSettingKey1", "AppSettingKey2" ]
    }
}

Here’s how it’ll look like in the portal:
Object Variables

Variables are not only useful for declaring text that is used in multiple places; they can be objects too! This is especially handy for settings that apply to multiple Web Apps in the template.

{
    // ...
    "variables": {
        "siteProperties": {
            "phpVersion": "5.5",
            "netFrameworkVersion": "v4.0",
            "use32BitWorkerProcess": false, /* 64-bit platform */
            "webSocketsEnabled": true,
            "alwaysOn": true,
            "requestTracingEnabled": true, /* Failed request tracing, aka 'freb' */
            "httpLoggingEnabled": true, /* IIS logs (aka Web server logging) */
            "logsDirectorySizeLimit": 40, /* 40 MB limit for IIS logs */
            "detailedErrorLoggingEnabled": true, /* Detailed error messages  */
            "remoteDebuggingEnabled": true,
            "remoteDebuggingVersion": "VS2013",
            "defaultDocuments": [
                "index.html",
                "hostingstart.html"
            ]
        }
    },
    // ...
}

And now we can use the siteProperties variable for the production site as well as its staging slot:

{
    "apiVersion": "2015-08-01",
    "name": "[variables('siteName')]",
    "type": "Microsoft.Web/sites",
    "location": "[parameters('siteLocation')]",
    "dependsOn": [
        "[resourceId('Microsoft.Web/serverfarms', variables('appServicePlanName'))]"
    ],
    "properties": {
        "serverFarmId": "[variables('appServicePlanName')]"
    },
    "resources": [
        {
            "apiVersion": "2015-08-01",
            "name": "web",
            "type": "config",
            "dependsOn": [
                "[resourceId('Microsoft.Web/Sites', variables('siteName'))]"
            ],
            "properties": "[variables('siteProperties')]"
        },
        {
            "apiVersion": "2015-08-01",
            "name": "Staging",
            "type": "slots",
            "location": "[parameters('siteLocation')]",
            "dependsOn": [
                "[resourceId('Microsoft.Web/Sites', variables('siteName'))]"
            ],
            "resources": [
                {
                    "apiVersion": "2015-08-01",
                    "name": "web",
                    "type": "config",
                    "dependsOn": [
                        "[resourceId('Microsoft.Web/Sites/Slots', variables('siteName'), 'Staging')]"
                    ],
                    "properties": "[variables('siteProperties')]"
                }
            ]
        }
    ]
}

Custom Time Zone

There’s a little-known setting in Azure App Service that allows you to set the time zone on a per-app basis. It is done by creating an app setting called WEBSITE_TIME_ZONE in the portal. It means we can also do this in an ARM template:

{
    "apiVersion": "2015-08-01",
    "name": "appsettings",
    "type": "config",
    "dependsOn": [
        "[resourceId('Microsoft.Web/Sites', variables('siteName'))]"
    ],
    "properties": {
        "WEBSITE_TIME_ZONE": "Pacific Standard Time"
    }
}
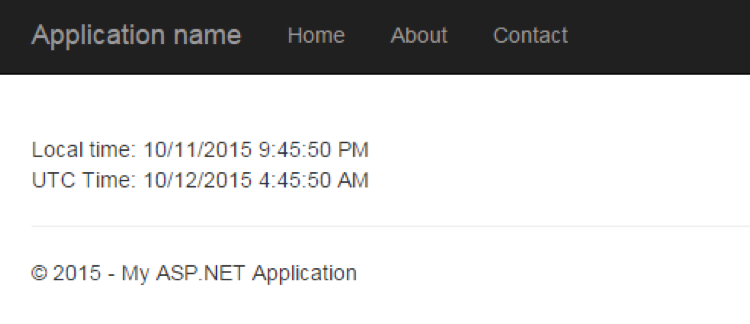
For more information on the time zone setting, check out this article.

Source code: WebAppManyFeatures.json

Allow access to Azure services, what does this actually mean?

I did some quick research on the SQL Server Firewall “Allow Access to Azure Services” option in Azure today.

And I sorry to say that my fears were right, that by setting this option does pose a significant security risk and leaves the SQL Server vulnerable.

Here is the extract of the article I found from Gaurav Hind at Microsoft

Access within Azure: This can be toggled by “Allow access to Azure services” Yes/No button on the portal (Firewall settings page). Please note, enabling this feature would allow any traffic from resources/services hosted in Azure (not just your Azure subscription) to access the database.

https://blogs.msdn.microsoft.com/azureedu/2016/04/11/what-should-i-know-when-setting-up-my-azure-sql-database-paas/

The big question now is how do you plug this gap in the firewall?  One possible solution is to build a virtual network within Azure or Filter network traffic with network security groups, this is beyond the scope of this article.

Comparing SecureStrings

After writing about SecureStrings, you soon come to realise that holding the secret information you are going to have to make some comparisons at some point. For example, if you need to check a password.

The important thing to remember is not to expose the password as text or hold it in memory for anyone or anything to sniff it out.

This code snippet does the job, but it what it does expose is a Timing Attack, but we will deal with that issue another day.

public static bool IsEqualTo(this SecureString ss1, SecureString ss2)
 {
 if (ss1 == null)
 throw new ArgumentNullException("s1");

if (ss2 == null)
 throw new ArgumentNullException("s2");

if (ss1.Length != ss2.Length)
 return false;

IntPtr bstr1 = IntPtr.Zero;
 IntPtr bstr2 = IntPtr.Zero;
 try
 {
 bstr1 = Marshal.SecureStringToBSTR(ss1);
 bstr2 = Marshal.SecureStringToBSTR(ss2);

int length1 = Marshal.ReadInt32(bstr1, -4);

for (int x = 0; x < length1; ++x)
 {
 byte b1 = Marshal.ReadByte(bstr1, x);
 byte b2 = Marshal.ReadByte(bstr2, x);
 if (b1 != b2) return false;
 }
 return true;
 }
 finally
 {
 if (bstr2 != IntPtr.Zero) Marshal.ZeroFreeBSTR(bstr2);
 if (bstr1 != IntPtr.Zero) Marshal.ZeroFreeBSTR(bstr1);
 }
 }

SecureString

Cryptography .NET, Avoiding Timing Attack

When comparing two MACs or hashes (also password hashes) for equality you would first think a simple comparison would be okay?  Think again as they are susceptible to timing attacks.

In cryptography, a timing attack is a side channel attack in which the attacker attempts to compromise a cryptosystem by analysing the time taken to execute cryptographic algorithms.

If you want to read more about this take a look at this article.

if ($hash1 == $hash2) {
//mac verification is Okay
return "hashs are equal"
} else {
//something happened
return "hashs verification failed!";
}

Okay, so what is wrong with this?

Both arguments must be of the same length to be compared successfully. When arguments of differing length are supplied, FALSE is returned immediately and the length of the known string may be leaked in the case of a timing attack.  It is done by timing the amount of time it takes to compare a known string length with the HASH, and as you will then find the length of the string based on the time it takes during the comparison.

Compares two-byte arrays in length-constant time. This comparison method is used so that password hashes cannot be extracted from on-line systems using a timing attack and then attacked off-line.

 private static bool SlowEquals(byte[] a, byte[] b)
 {
 uint diff = (uint)a.Length ^ (uint)b.Length;
 for (int i = 0; i < a.Length && i < b.Length; i++)
 diff |= (uint)(a[i] ^ b[i]);
 return diff == 0;
 }

What does the line diff |= (uint)(a[i] ^ b[i]); do?

This sets diff based on whether there’s a difference between a and b.

It avoids a timing attack by always walking through the entirety of the shorter of the two of a and b, regardless of whether there’s a mismatch sooner than that or not.

The diff |= (uint)(a[i] ^ (uint)b[i]) takes the exclusive-or of a byte of a with a corresponding byte of b. That will be 0 if the two bytes are the same, or non-zero if they’re different. It then ors that with diff.

Therefore, diff will be set to non-zero in an iteration if a difference was found between the inputs in that iteration. Once diff is given a non-zero value at any iteration of the loop, it will retain the non-zero value through further iterations.

Therefore, the final result in diff will be non-zero if any difference is found between corresponding bytes of a and b, and 0 only if all bytes (and the lengths) of a and b are equal.

Unlike a typical comparison, however, this will always execute the loop until all the bytes in the shorter of the two inputs have been compared to bytes in the other. A typical comparison would have an early-out where the loop would be broken as soon as a mismatch was found:

Microsoft provides a SecureString to hold sensitive data, and this uses a generic method Equals(Object), which determines whether the specified object is equal to the current object. There is no information saying that Equals method protects against Timing Attacks. Therefore we can only conclude that it is not safe for this operation.

I would suggest research into writing our own String Compare that is protected against Timing Attacks.

I’m not sure about all of this and further research is required, I did find this article which would be worth considering:

https://paragonie.com/blog/2015/11/preventing-timing-attacks-on-string-comparison-with-double-hmac-strategy

this and that